
Papad katori chaat recipe is the best hack for those who enjoy the crunch of the traditional Indian street foods. And want to have a non-fried, fast version at home. This papad katori chaat recipe, as the name implies, is a crispy, edible bowl consisting of nothing but a papadum. A tasty and protein-rich salad of chickpeas.
These snack bowls are a flavorful, calorie-free way to have a spectacular appetiser in less than 20 minutes. Whether you are clearing out leftover papads in the pantry or need to impress your party guests with an appetiser.
Here, you will learn how to water-dip your papads. To make them soft, the trick is to manipulate them with regular kitchen bowls. A new filling that will not create a wet katoris.
About Papad Katori Chaat Recipe
An innovative Indian snack, the papad katori chaat recipe turns an ordinary lentil cracker (papad) into a practical bowl. Conventionally, cooks roast or deep-fry papads, but in this papad katori chaat, they moisten the papads to a slight extent and roll them into a greased bowl. Then bake them in the microwave until they solidify into a permanent cup-shaped appearance.
It is an excellent option for modern Indian entertainment. Being a no-knead version of a conventional recipe of flour-based katori chaat recipe. The stuffing will be a typical Chana Chaat-style salad, full of the zest of amchur (mango powder). And the spiciness of green chillies, and the freshness of cilantro.
Why It is the Ultimate Healthy Snack
The papad katori chaat is a unique recipe of Indian snacking due to its natural gluten-free and vegan characteristics. It offers all the spicy, daring flavours of street food, without the high-calorie levels of oil-fried foods. Base prepared using lentil flour (moong or urad dal), gives your snack break a touch of protein.
It is a popular substitute for a heavy ragda chaat recipe in most households in need of something crunchy yet light. The mere pleasure of consuming your bowl with the spicy chickpea stuff makes it an entertaining, interactive activity for both children and adults.
Recipe Card

Papad Katori Chaat Recipe: Crispy Papadum Cups
Ingredients
For the Katoris
- 6-8 Papadums jeera, pepper, or chili taste
- Water in a flat plate for dipping
- A small amount of Oil for greasing the bowls
Filling Process
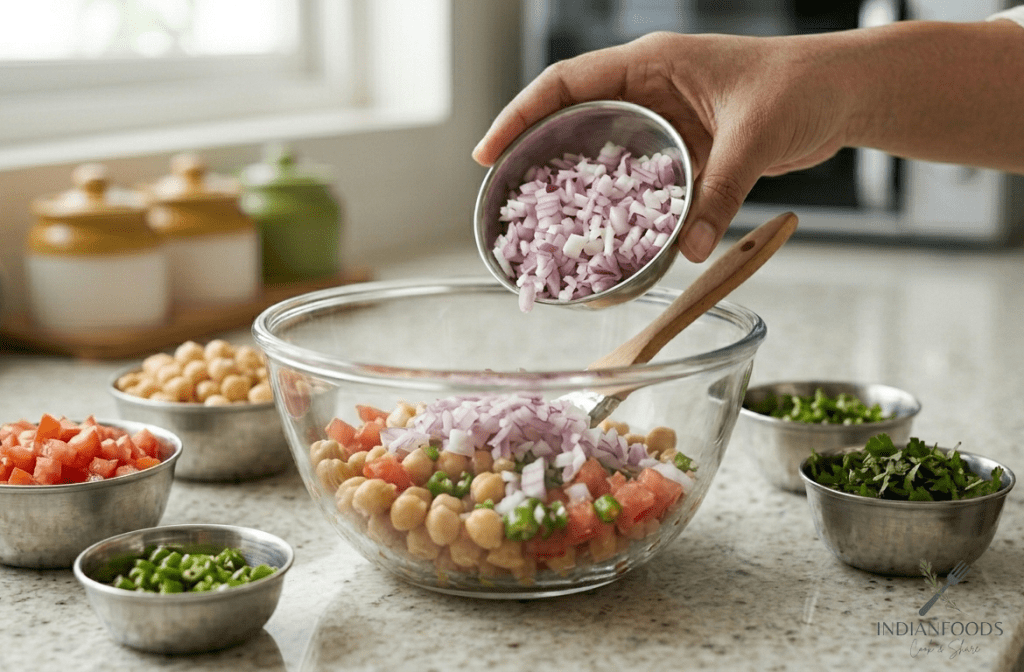
- 2 cups Boiled Chickpeas canned or freshly boiled
- 1 large Onion finely chopped
- 1 large Tomato cubed
- 1-2 Green chilies finely chopped
- 2 tbsp Cilantro leaves chopped
- ½ tsp Red flakes
- 1 tsp Roasted cumin powder
- 1 tsp Amchur powder Dry mango powder
- Salt to taste
- 2-3 tsp Lemon juice
For the Garnish
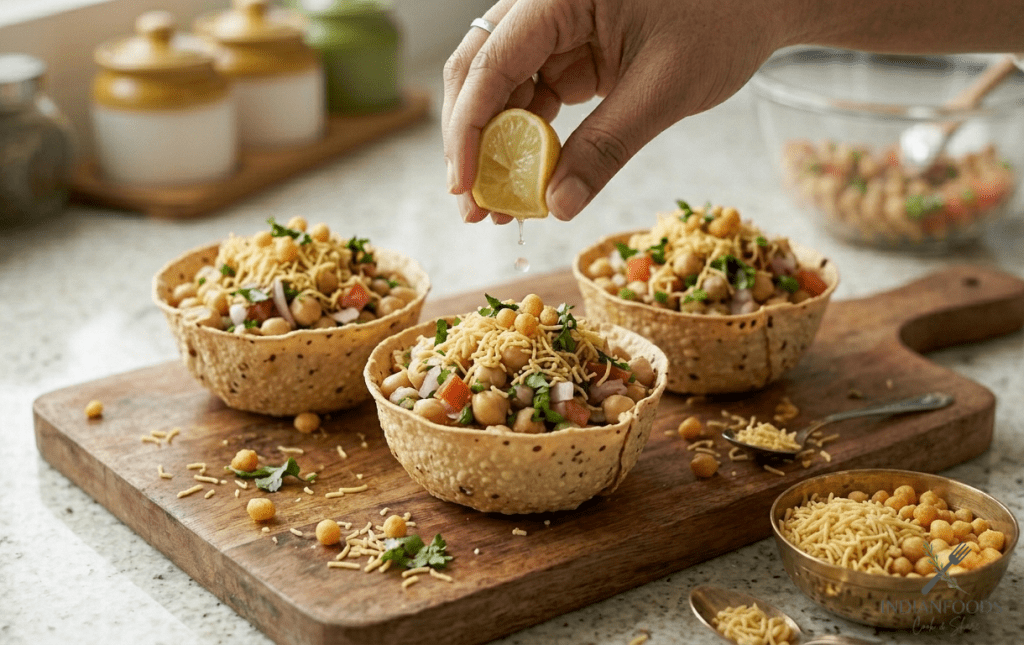
- 1 cup Boondi pearls of crispy gram flour
- 2 tbsp Thin Sev gram flour vermicelli
- Fresh cilantro
Instructions
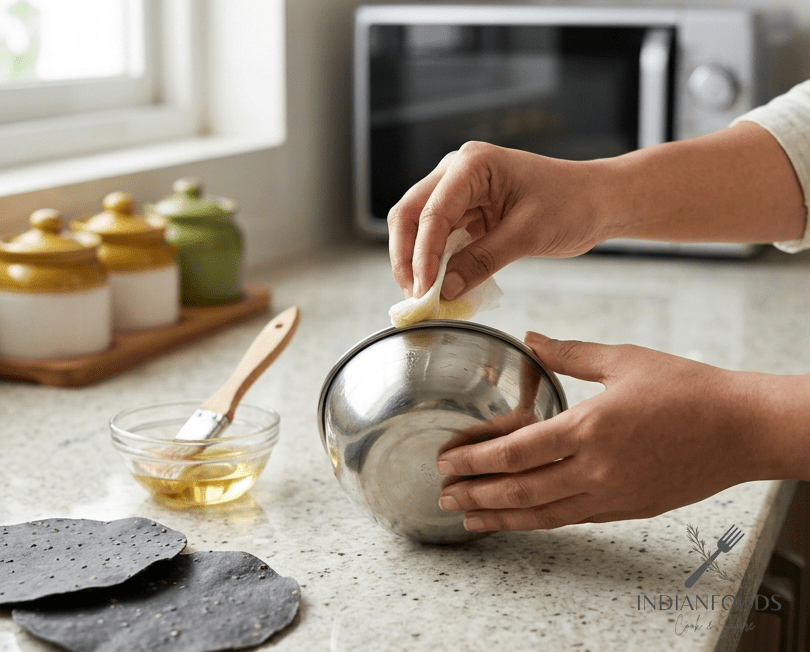
- Use the preparation: lightly grease the outside of a small bowl with oil (katori) that can be used in a microwave. Set it aside.
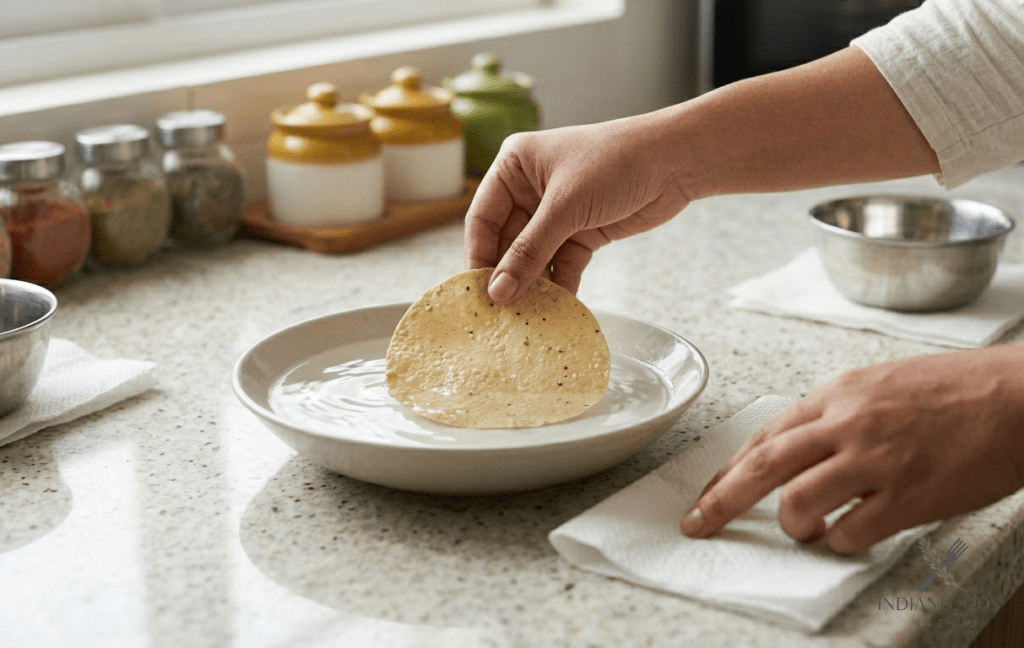
- Pick one papad and put it in a plate of water for a duration of 2 seconds, only until it becomes slightly soft. Take it off and dry it with paper towels to get the excess water.
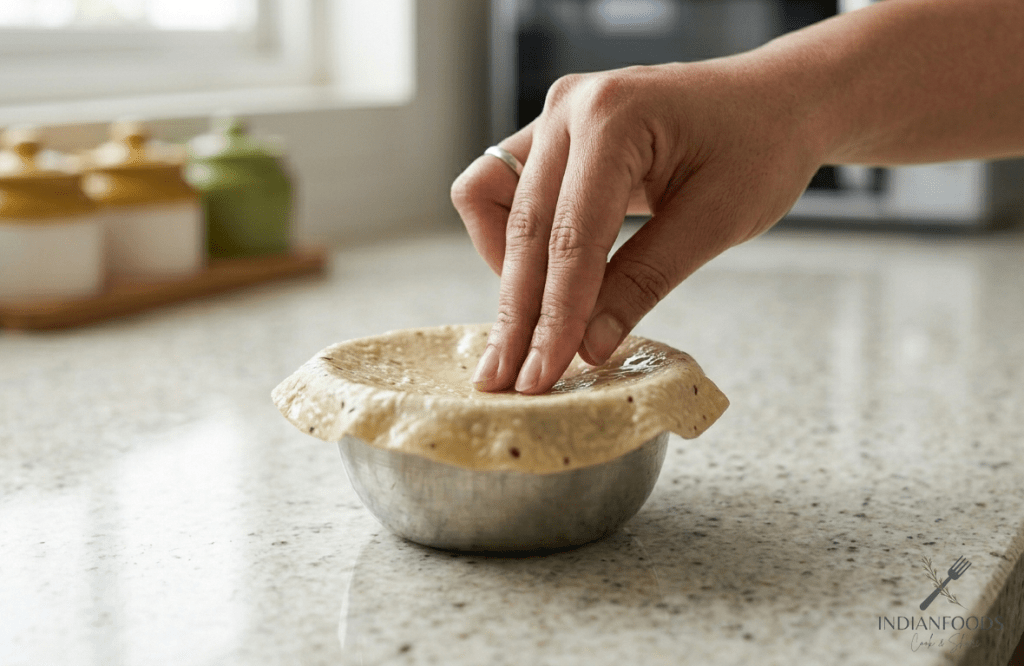
- Fill the papad with water and cover the katori with the moistened soft papad. Press the centre to shape and crease the sides around the bowl to create a cup.
- Put the katori (and papad on it) in the microwave and cook under HIGH for 60 seconds. In case it is still a little soft, add 30 more seconds until it is crisp and will maintain its shape.

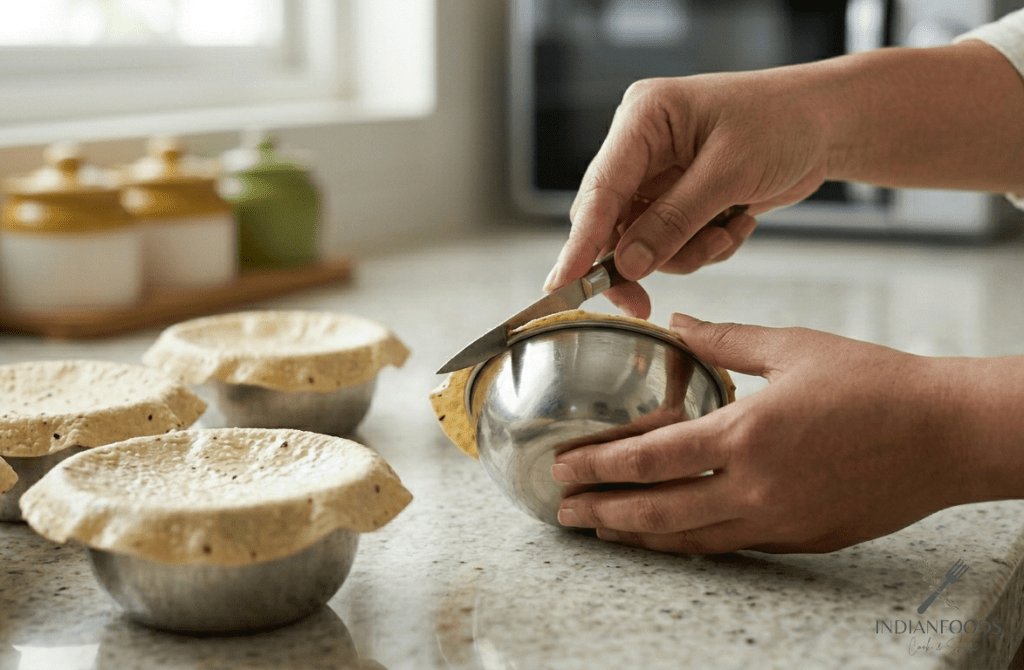
- Cool down for a few seconds and then carefully use a knife to run around the rim to loosen the papad in the bowl. Repeat the same with all katoris.
- Add the chickpeas, onions, tomatoes, green chilies and cilantro into a large mixing bowl. Add the red chilli powder, cumin powder, amchur, and salt.
- Add lemon juice when it is time to eat. Put 2-3 tablespoons of the filling into each papad dish. Serve with boondi, fine sev, and cilantro. Serve immediately!
Notes
- Squeeze every drop of water from the papad after dipping to ensure the katori becomes perfectly crisp and doesn’t remain chewy.
- Grease the microwave bowl thoroughly to ensure the hardened papad slips off without sticking or breaking during removal.
- Assemble the katoris at the very last minute to prevent the crispy walls from absorbing moisture and turning soggy.
Tips for Ideal Papad Katori Chaat Recipe
- Wet the papad only until it becomes flexible; leaving it in water too long will make it mushy and impossible to mould.
- Make sure you dry the papad with a paper towel because too much water will not allow it to be fully crisp in the microwave.
- It should also be always well greased in the microwave bowl so that the hardened papad can slide off easily and not stick or crack.
- Prepare the chaat at the absolute last minute since the thin walls made of papad will absorb the moisture in the salad and become sloppy when left to stay.
Variations of Papad Katori Chaat Recipe
- Potato Filling: Replace the chickpeas with boiled potato cubes and serve with sweet tamarind and spicy green chutneys to create a similar flavour equation to a papdi chaat recipe.
- Ragda Style: Warm and thick pea gravy, made with yellow peas, can be poured into the bowls in place of a ragda chaat recipe.
- Classic Katori Style: Combine sprouts, pomegranate seeds, and sweetened yoghurt, and replicate a classic katori chaat dish.
- Warm Tikki Filling: Put a small, hot aloo tikki into the papad bowl and pour over whisked curd to make a hybrid aloo tikki chaat recipe.
Storage Tips
- Make the papad katoris 2-3 days before and keep it at room temperature in a dry and airtight container
- During rainy seasons when they lose their crunchiness, just place the katoris in the microwave oven and leave them in it for 20 seconds to crisp up once again prior to serving
- It is possible to prepare the vegetables in advance and boil the chickpeas, but refrigerate them and only add salt and lemon at the time of assembly.
Mistakes to Avoid
- Papads with pre-existing cracks will result in the fall of the bowl when it solidifies in the microwave
- Omitting the greasing will result in sticking the papad to the microwave bowl, thus breaking it when attempting to remove it
- Prematurely adding the lemon juice or salt to the vegetable mixture will leave the salad watery hence immediately ruining the crunchiness of the katori
- When the papad is overcooked in the microwave, it may easily burn since it contains a lot of lentils and spices
Conclusion
The papad katori chaat recipe can be seen as a testimony to the power of creative cooking in transforming a simple pantry item into a fancy appetizer. It is a dish that will bring out the best crunch with minimum effort and is therefore the best wow-factor snack in your next get-together.
It only takes a few minutes in the microwave to have a taste of the colorful, spicy streets of India with this fast and easy approach to Indian cuisine. Stuff them to the brim, top them high and savor the ideal crunch of this homemade papad katori chaat recipe!
Related Recipes
FAQs
Dal-based papads (moong or urad) would be the most suitable for this papad katori chaat recipe because they are firmer, and they would be better placed in the bowl shape than rice papads.
It is vegan, non-fried, and gluten-free, so it is considerably lighter than the traditional fried chaats made of flour.
This normally occurs when the papad is dry when moulding or when you failed to grease the mould bowl.
It is easier to roast the papad and press it in a bowl when it is hot, but the most convenient way is to use the microwave to shape it into a perfect shape, which beginners can easily do.
Their shelf life is approximately 5-10 minutes. To have enjoyed them properly, consume them as soon as they are assembled.
